
I decided to shabby chic it a bit and I wanted to make the mirror look rustic. I painted this all with acrylic paints, silver & gold antiquing paint and MS Crackle paint. I have made modern mirrors appear antique in the past by using the "SILVERING GLASS" method but with my crazy late night crafting hours I don't like to use chemicals. I will eventually blog about one of my mirrors done with silver nitrate, amonia, and more nasty chemicals! We will wait until the windows can be open, or better yet...an outdoor craft idea! For now, I will give you instructions on my safe method mirror!
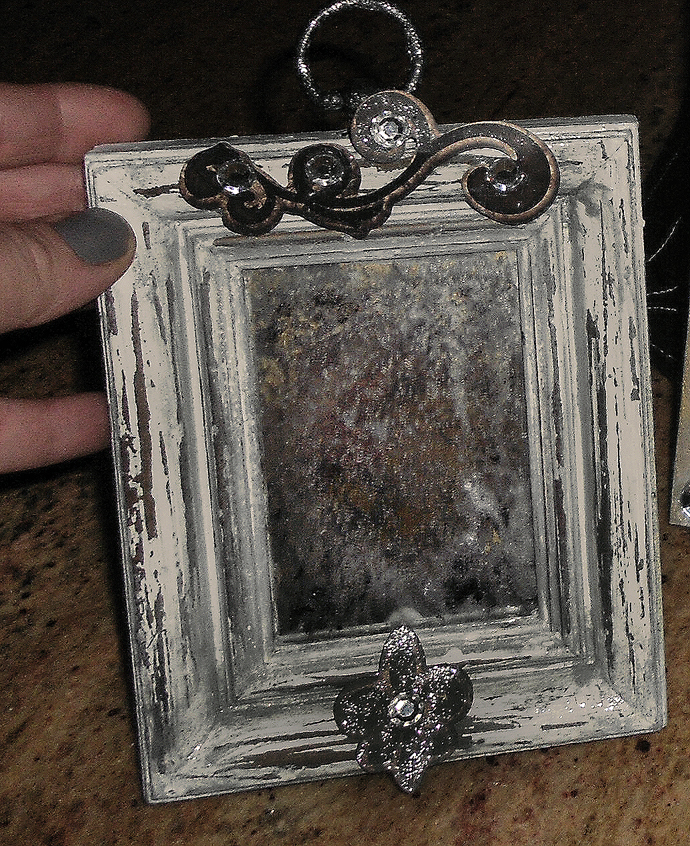
Okay so basically like I said, this was brown, chipped, blah!
Here is what you need to make this very in expensive SHABBY-LICIOUS
mirror. It's a great idea to always keep somewhat of a "stockpile" of paints and crafts if you love to be crafty, in the long run these projects will practically cost nothing!
WHAT YOU WILL NEED:
- an old mirror or a new one if you prefer. I like restoring old pieces because the wood is usually better to work with...paint seeps in nicely, and I love indents.
- acrylic paint- white, ivory or ecru, black, dark brown
- varnish gloss
- silver/gold antiquing paint
- crackle paint
- razor blade
- embellishments
- cotton balls
- painters tape
HOW I DID IT:
- clean the frame with a lukewarm rag if it's old to remove dirt or grease.
- I start with the mirror first! make a palette of a small amount of your colors.
- take the cotton ball and dip in a color and pat it on the mirror. You should pat it on a paper towel first. We don't want obvious globs of paint. Move on to a different color, and so on. You can see I also used a bronze paint in the center, and this is where the silver & gold paint comes in to play.
- When your mirror is dry and you are satisfied with it, give it 2 coats of gloss and let dry.
- When mirror is completely dry tape the edges with BLUE PAINTERS TAPE.
- Now start on your wood... paint with a flat brush and go from color to color. I wipe the brush so I don't have a lot of watery streaks. Get creative, you don't have to work exactly like I do.
- When your paint is dry, add a coat of crackle. I use Martha Stewart brand, but any of them are fine.
- When the crackle is dry, CAREFULLY take your razor blade and scratch the frame so that the paint comes off and the original wood is visible.
- When finished dust it off, carefully peel off your tape from the mirror and give the whole piece a light coat of gloss!
- I added some embellishments because I'm totally gaudy, but you can skip that part if you like!
I hope you enjoyed this craft. If you do this craft, please feel free to post pics to share! Have fun!!
No comments:
Post a Comment